Cyrus PSXの謎
 謎という訳ではないのですが、ふとPSXがないCyrus Twoの音は記憶しとくべきかなと、まずはPSXを取り外した状態でさらっと音楽を聴いてみて、その後、PSXを接続した状態に戻してみました。
昨日のエントリでは書き忘れましたが、Cyrus TwoにPSXを接続するためには、Cyrus Twoの中身も弄らなければなりません(だから単体に戻すのが面倒と書いています)。
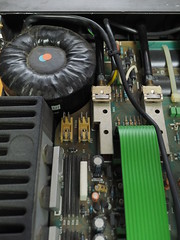
弄るって程でもないのですが、PSXを接続する際はCyrus Twoの基板上にあるFS1とFS2のヒューズを外す必要があります。場所は写真中央ちょい左側に見えるヒューズソケットがそれです。規格は250V/F4A。FはFast、つまり速断タイプのヒューズです。
それとは別に、Cyrus Twoのメインヒューズは100V/120環境下では250V/T2.5A、PSXのメインヒューズも同じ環境下で250V/T4Aが指定されており、こちらのTはTime-lagという意味で、溶断まで時間差があるスローブロータイプのヒューズとなります。
ちなみにFS1とFS2のヒューズを外さずにPSXを接続すると、アンプか電源…どちらかの基板上にあるヒューズが飛ぶ…もしくは基板上のパーツに深刻なダメージを与えるそうで、このPSXが入手時、基板上にあるヒューズが2本とも切れていたのは、誤った接続のせいだったのかもしれません。一説によるとCyrus Two側のインレットに電源ケーブルを接続してメインスイッチをONにしなければ大丈夫という話もありますが、わざわざ試す必要はないと思います。
この変更は本来ユーザー自身での作業が許されている部分ではなく、マニュアルには販売店を通してサービスに依頼せよとの指示があります。
もっとも今時Cyrus TwoとPSXを日本国内で入手した人は、既にサービスに依頼できる状況ではないと思いますので、該当部分のサービスマニュアル、テキスト起こしを掲載してみましょう。スペルミスがあったらゆるして。
1. Disconnect the Cyrus Two amplifier from the mains and leaved discnnected overnight.
2. Remove all interconnect and loudspeaker cables.
3. Carefully remove the ground nut situated close to the phono inputs at the rear of the amplifier.
4. Carefully remove the two case securing screws/bolts located on the back of the unit. Then remove the two or four which are located on the sides of the amplifier close to the front panel.
5. With the amplifier in front of you gentfy lift the back of the case to an angle of approximately 45 degrees then gently pull the, case towards you.
6. You will now be able to see the circuit board. There are two glass fuses located near the mains transformer (See Diagram) these need to be removed. Using the Allen key -- hook the short end under one end of the fuse and lift, once. the fuse has been lifted remove it from the fuse holder, Remove the other fuse in the same way.
7. At the rear of the amplifier you will see the PSX socket, this is normally blanked off using either a plastic disc or a rubber bung in either case remove the item so that the socket is clear and ready to accept the PSX lead.
8. Replace the case by inserting the front under the front panel and then lower the case to its normal position.
9. Replace all the case screws/bolts. Do not force any of the screws/bolts as this may cause damage to both the case and chassis, in this event remove and refit the case ensuring all holes are aligned.
10. Replace ground nut.
11. Connect lead from the PSX to the Cyrus two PSX socket.
12. Connect interconnects and loudspeaker cables, double check all connections.
13. Connect mains leads .
14. Ensure "Cyrus Two volume control" is set to minimum and that the listen selector is set to mute.
15. Turn on both the "Cyrus Two" and PSX.
16. Select a source and listen.
必要な方は上記の手順をしっかり守って作業して下さい。もちろん自己責任だし、私は情報を開示しているだけで作業を推奨している訳ではありません。責任は全く取れませんが、特に事故を防ぐために「1」は重要です。
で、話を戻しますと、Cyrus Twoを単体のプリメインに戻すためには、再びカバーを開けて基板上のヒューズを再装着する必要があります。
この状態で音を聴いてみると…あれ?以外といいのでは??思ったよりも音が劣化しないというかPSX駆動の状態と差がない気がします。
う〜む…と思って、しばらくしてから再びCyrus Twoのカバーを開けてヒューズを引っこ抜いて、PSXから電源を供給してみたら、これはすごい!やっぱり全然違う!!音のレンジも広がるし特に驚くのがステレオ空間がグンと前後に広がること。やっぱり比較してしまうと当たり前だけど全然違いました。
Cyrus Two単体に戻したときは、その前にPSX駆動の状態を聴いていなかったから「あれ?以外とイけるのでは?」と思ったのかも…いや確かにCyrus Twoの音は単体でもイけているので、この感想も間違いではないのですが。
ということで、Cyrus Two単体の音を聴いたことある人は案外いると思いますが、PSX駆動を比較した文章ってあまり見たことない気がしましたので、ちょっと書いてみました。
くれぐれもアンプ側の基板上にあるヒューズ引っこ抜く前にPSXつながないでね(とくにアンプ側の電源がONの状態で電源ケーブルをインレットへ差し込まないで)!どちらかがぶっ壊れますよ。
